
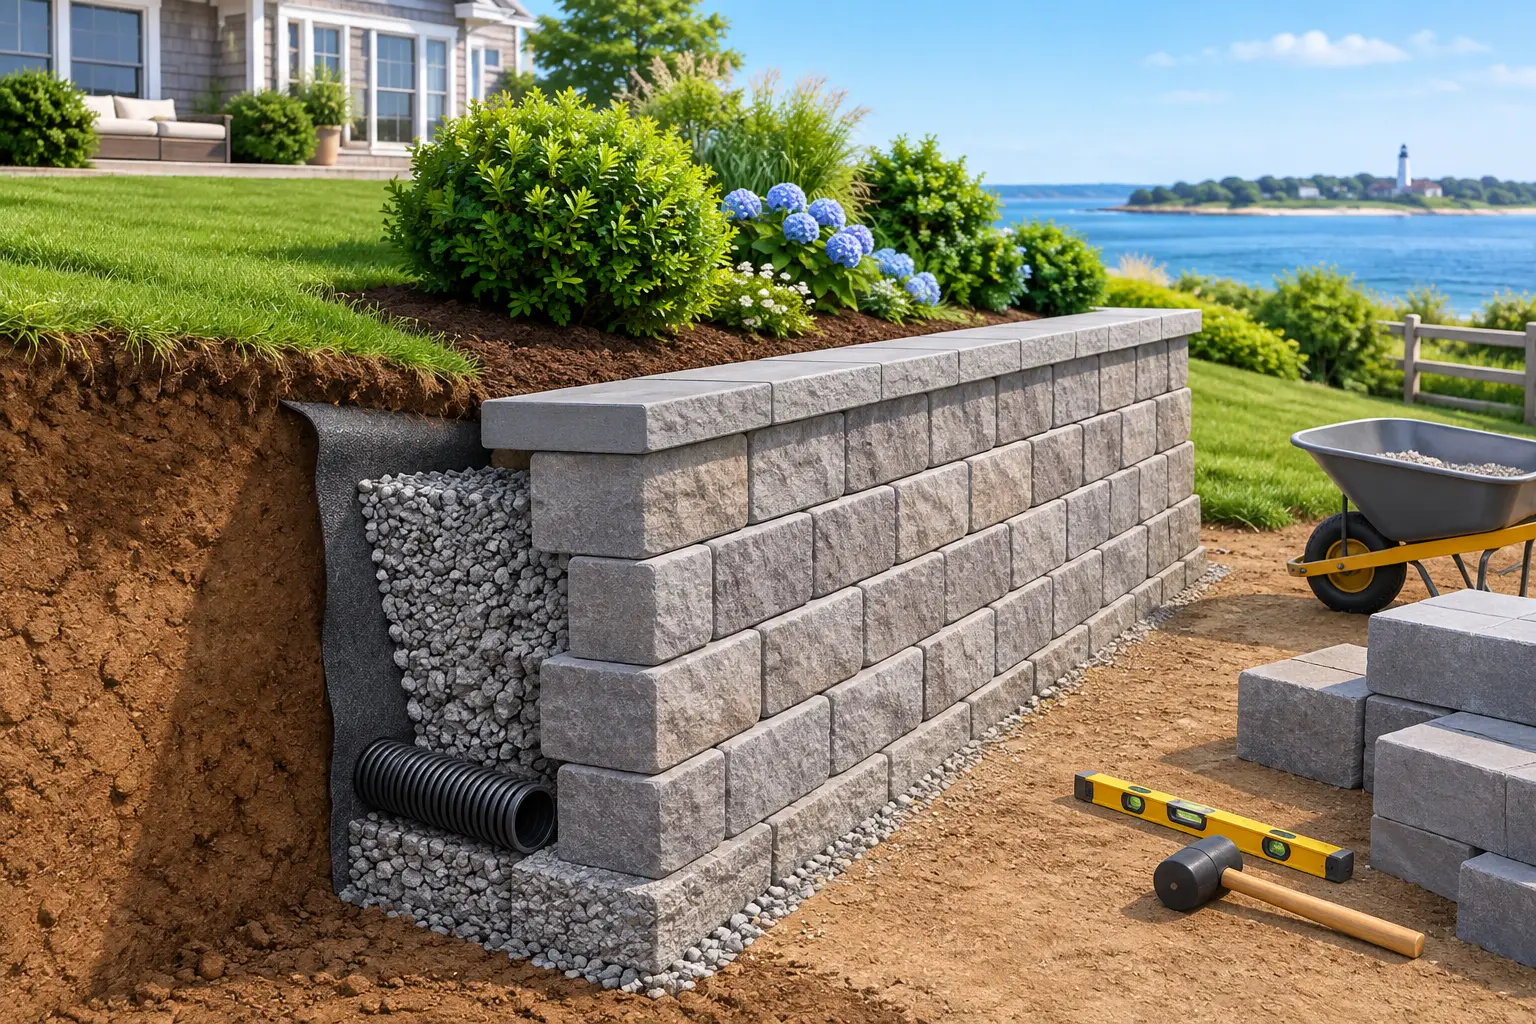
A retaining wall can make a sloped yard usable, protect a driveway or walkway, and give a landscape a cleaner finished look. But it is not simply a row of blocks stacked along a hill. This retaining wall installation guide explains the preparation behind a wall that stays straight, drains properly, and holds up through Long Island rain, freeze-thaw cycles, and everyday use.
Start With the Job the Wall Needs to Do
The first question is not what color block to choose. It is what the wall must support. A short decorative wall around a planting bed has very different requirements than a wall holding back a sloped lawn, driveway edge, patio, or parking area.
Measure the height from the low side of the finished grade to the top of the wall. As a general rule, walls around 3 to 4 feet high, or walls carrying extra weight from a vehicle, structure, steep slope, or nearby drainage, need more careful engineering and may require permits. Local requirements can vary by community, so check before ordering materials or breaking ground.
Also consider where water naturally travels across the property. Water is one of the main reasons retaining walls lean, crack, or fail. If a downspout empties behind the future wall, or a driveway sends runoff toward it, that drainage issue needs a solution before installation begins.
Choose Materials That Fit the Property
Concrete retaining wall block is a popular choice because it is durable, available in many styles, and designed to lock together. It works well for most residential landscape walls when installed on a properly compacted base. Natural stone can create a more traditional look, but it takes skill to fit securely and may cost more in labor and material.
Poured concrete walls can suit certain applications, especially when a clean, modern finish is the goal. They require forms, reinforcement, proper curing, and reliable drainage behind the wall. Timber walls are usually less expensive upfront, but wood is more vulnerable to moisture, insects, and eventual rot. They can be practical for a modest garden wall, but they are rarely the longest-lasting option.
Match the material to the job, the home, and the budget. The least expensive material is not a bargain if it needs repair a few years later. At the same time, a high-end stone wall may not be necessary for a simple grade change beside a backyard lawn.
Mark the Layout Before Excavating
Use stakes and string to mark the wall line. Stand back and look at it from the driveway, patio, and street if the wall will be visible from the front of the property. Gentle curves often look more natural in a landscape and can be easier to build with segmented wall block than a tight turn.
Call for utility marking before digging. Even a relatively shallow excavation can create a serious problem if it reaches a buried gas, electric, cable, irrigation, or water line. This is a small step that protects both the property and the crew.
Plan room behind the wall for drainage stone and pipe. A wall built tightly against the hillside without this space may look fine on installation day, but pressure can build behind it after heavy rain. That pressure, called hydrostatic pressure, pushes outward and is hard on any wall system.
Retaining Wall Installation Guide: Build the Base Correctly
The base determines whether the wall stays level. Excavation should be deep enough for a compacted aggregate base, the buried portion of the first course, and enough width to support the block. For many segmental block walls, the first course is partially buried to help resist movement and give the wall a grounded appearance.
Remove soft soil, roots, loose fill, and organic material from the trench. These materials compress over time and can cause uneven settling. Then install crushed aggregate in thin layers, compacting each layer before adding the next. A plate compactor is generally the right tool for this work. Simply walking over the stone or pressing it down with a shovel does not create the stable base a retaining wall needs.
Check the base with a level from side to side and along the wall line. This work can feel slow, but it saves time later. If the first course is out of level, every row above it follows the same problem. Trying to correct a crooked wall by shimming upper blocks usually leads to gaps, uneven joints, and a poor result.
A slight step-up in the base may be needed where the grade changes. Keep the first course buried consistently as the wall climbs the slope. Do not place blocks directly on dirt, sand, or an un-compacted layer of gravel.
Install the First Course With Care
Set the first row of blocks one at a time, checking level after every few pieces. Use a dead-blow mallet to make small adjustments. Keep block faces aligned with the string line or planned curve, and sweep the tops clean before setting the next course. A small piece of gravel caught between blocks can throw off the row above it.
For curved walls, follow the block manufacturer’s recommended radius. Forcing units into a curve that is too tight can create wide joints and weaken the connection between blocks. If cuts are needed, use the proper masonry saw or splitter and wear appropriate protective equipment.
Offset the vertical seams as you build upward. This staggered pattern improves the wall’s strength and gives it a cleaner appearance. Make sure each block’s rear lip or connection system is seated properly on the course below.
Drainage Is Not Optional
A dependable retaining wall needs a way to move water away from the back of the wall. Install clean drainage stone behind the blocks as the wall rises. For many walls, a perforated drain pipe at the base of the wall directs water to a suitable outlet away from the structure and neighboring properties.
The exact pipe location and outlet depend on the grade and site conditions. A drain pipe that ends with nowhere for water to go does not solve the problem. In some yards, daylighting the pipe at a lower point works well. In others, the drainage plan may need to tie into an approved system.
Use landscape fabric where appropriate to separate soil from the drainage stone. This helps reduce the amount of fine soil washing into the stone over time. It should not be used as a substitute for gravel, compaction, or proper drainage routing.
Backfill and Reinforce as You Go
Do not build the full wall and then dump soil behind it all at once. Backfill in manageable lifts, compacting the material behind the drainage zone as the wall goes up. Keep the drainage stone clean and avoid mixing it with excavated soil.
Taller walls may require geogrid reinforcement, which is a strong mesh placed between block courses and extended back into the slope. The grid helps connect the wall to the soil mass behind it. The needed grid length, spacing, and wall design depend on height, soil conditions, and the loads above the wall. This is one area where following the wall system specifications and getting professional guidance matters.
Be especially cautious if the wall is near a driveway, pool, foundation, septic area, fence, or property line. These conditions can change the design considerably. A wall supporting pavement has to handle more than soil alone.
Finish the Top and Grade the Yard
Cap units give a retaining wall a finished edge and help secure the top course. Dry-fit the caps first, especially around curves, before using a landscape block adhesive. Allow the adhesive to cure as directed and avoid putting weight on the wall immediately afterward.
Finish the soil behind the wall so it slopes gently away from the top. This reduces the chance of water collecting behind the caps. Add mulch, planting beds, grass, or stone once the surrounding grade is stable. Avoid placing heavy planters, sheds, or other loads close to the wall unless the design accounts for them.
After a major rain, walk the area and look for standing water, soil washing out, or drainage that is heading toward the house. Catching a grading issue early is much easier than repairing a settled wall later.
Know When a Professional Is the Better Choice
A small, low garden wall can be a reasonable project for an experienced homeowner with the right tools and time. A structural wall is different. If the wall is tall, supports a slope or driveway, needs extensive drainage work, or sits near a building, professional installation can prevent costly mistakes.
For Long Island property owners, Big Apple Paving and Remodeling can assess the grade, drainage needs, wall location, and finish options before work begins. A clear estimate and a practical plan help keep the project on schedule and avoid surprises once excavation starts.
A retaining wall should do its job quietly: hold the grade, direct water where it belongs, and make the property easier to use. Give the base, drainage, and layout the attention they deserve, and the finished wall will be something you can rely on for years.